

Looking for a way to never disable your VPN, and thus never lose anonymity, security, and freedom while browsing the Internet? Perfect, that’s what should most of us do. That way, we would never have to worry about the heart-wrenching feeling realization that you forgot to enable the VPN after an hour of surfing. Plus, neither our ISP nor the websites we visit would never be able to track our habits and interests and try to upsell their subscription plans and additional features. Sounds good? Sounds ideal to us. Here’s how to make a VPN always ON.
How to make a VPN always ON
Obviously, we cannot cover every VPN provider under the sun. For that reason, we’ll demonstrate the process by using two of the most popular ones, in our opinion. The steps should be pretty similar in other providers’ software.
ExpressVPN on a PC
- Visit the ExpressVPN Software page.
- Download the appropriate program, install, and run it.
- Click on Sign In.
- Enter the code you received in the e-mail when you bought a VPN.
- Click Sign In again.
- This is the important part: Click on Allow when prompted to Launch on Startup.
- Choose between Allow or Don’t Allow when prompted to Help Improve ExpressVPN.
- Don’t go ahead and connect to a VPN yet.
- Click on the three horizontal lines in the top left corner.
- Click on Options from the drop-down list.
- Switch over to the General tab.
- Make sure to check the box in front of Launch ExpressVPN on Windows startup.
- Ensure the box in front of Connect to the last used location when ExpressVPN is launched is checked.
- Enable Network Lock by putting a checkmark in front of the option if it isn’t already there.
- Enable split tunneling below, and configure apps by clicking on Settings.This will allow you to enable VPN on certain apps only, and let others use your real IP address. If you’re going to run a VPN 24/7, there will come a time when you need to access your social media, bank, online payment systems, etc. Those services wouldn’t recognize you otherwise, and wouldn’t let you in, even with the correct login information.
- Don’t forget to check a VPN connection every once in a while.
NordVPN on a PC
- Download NordVPN software.
- Install and run the program.
- Enter the e-mail address and password you chose when you registered the account.
- Tap on Sign In.
- You will see a map of the world with available servers. Don’t connect yet.
- Click on the cogwheel (gear) icon in the top right corner.
- Once the Settings window opens up, make sure Launch at Windows startup is enabled. The process is identical to macOS.
- Optional: Enable Launch the app minimized.
- Optional: Enable CyberSec, which will block ads and malware while you browse.
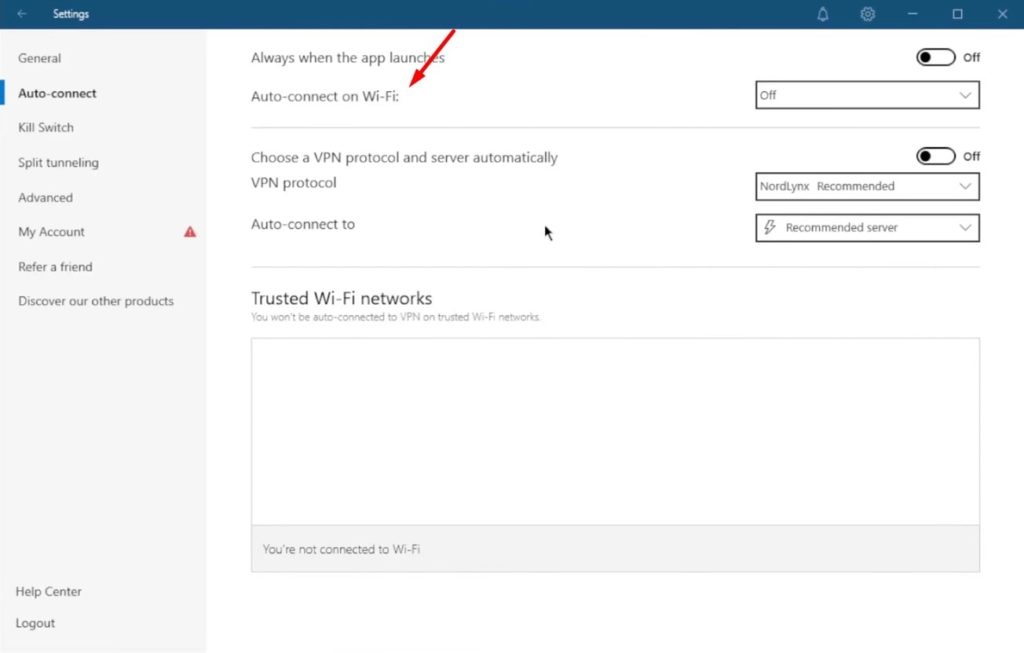
- Click on Auto-connect in the menu on the left.
- Enable Always when the app launches.
- Enable Choose a VPN protocol and server automatically.
- For protocol, choose either OpenVPN (TCP/UDP) or NordLynx.
- For server, pick one that fits your needs or the one with the fastest VPN speed and lowest latency (closest to your real location).
- Go to the Kill Switch menu on the left side. Enable the feature.
- Go to Advanced. Enable split tunneling, and choose apps accordingly. The feature is identical to the one ExpressVPN uses.
- Optional: Enable Obfuscated servers if you plan on streaming or going to China.
On older versions of NordVPN, you will have a screen like this. You can enable the Auto-connect on Wi-Fi option.
The process will be similar to most of the VPN services. You will find some features similar to the steps given above to make the VPN ON all the time.
Staying always connected on Android
By following the steps below, you can stay connected to a VPN on Android devices:
- First, install a VPN on your Android phone.
- Then go to your device’s settings and tap on Network & Internet or Other Networks and Connections.
- Now tap on VPN.
- Then, select the VPN and go to Settings.
- Toggle the Always On VPN. Remember, this feature is solely meant for manually installed VPNs.
- Finally, click on Save.
Using NordVPN to always stay connected on iOS
We will be using NordVPN to demonstrate how to stay connected to a VPN on an iOS device:
- Start by opening your NordVPN app and going to Settings.
- Then, tap the Auto-Connect option.
- Here, specify if you want to enable this on a Wi-Fi connection or any network.
- And that’s all.
On macOS
Similarly, you can use NordVPN on any Mac device to stay connected to a VPN:
- Open your NordVPN app and visit the Setting.
- On the left side of the menu, find Auto-Connect and click it.
- Now, toggle the When Using Untrusted Network button.
- The app will, by default, connect you to the recommended VPN server.
- And you are done.
Staying connected on Linux
And finally, we have Linux. And we can still use NordVPN to connect to a VPN continuously.
- First, open the Command Terminal using Ctrl + Alt + T.
- Then, enter the following command:
nordvpn set autoconnect on country_code+server_numberAnd that’s all.