

Searching for steps to configure a VPN on Windows? You’re in the right place. Welcome! Since you already made a decision, you should be familiar with reasons to use a VPN. There are many, truly, and some of them you might never use. Let’s list a few main ones. Anonymity while browsing by hiding your IP address, encryption of your Internet traffic, downloading/torrenting, bypassing a VPN block by websites, and streaming services, such as Netflix VPN block. Sounds like something you can use? If so, let’s teach you how to setup a VPN on Windows so you can be on your way.
Setting up a VPN on Windows
Configuring a VPN on Windows is easy, provided you have the required information from a network administrator, free VPN, or a premium VPN provider. Here’s how it’s done.
Importing and exporting VPN settings
Windows 10 does not have a designed way to import and export settings. But don’t worry, there is a workaround, although more complicated and time-consuming than setting up a VPN on Mac is.
The VPN configuration settings are stored inside a Pbk folder. There is no way to import multiple VPN settings at once, as they will be overwritten every time you import them. For that reason, it is strongly advised to keep different versions of the Pbk folder, and simply switch between them.
- Open the Windows 10 File Explorer (Windows key + E) or My Computer/This PC.
- Click on the address bar at the top, and delete everything.
- Paste the following line:
%AppData%\Microsoft\Network\Connections - Hit Enter on your keyboard.
- Paste the Pbk folder here.
Steps to setup a VPN on Windows manually
- Press the Windows key on your keyboard to open the Start bar.
- Start typing or ‘VPN’.
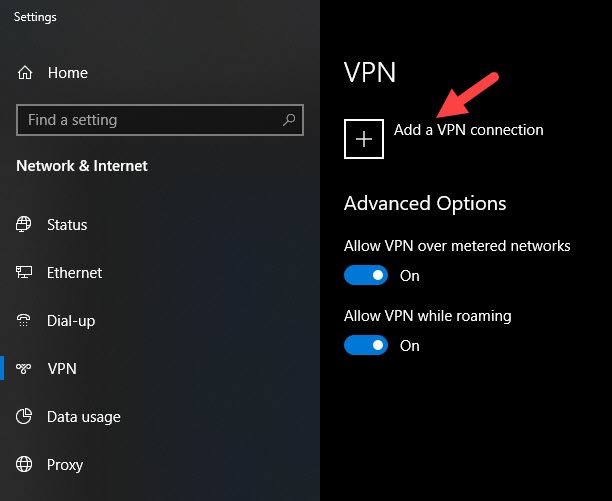
- Click on the VPN Settings option that appears.

- Click on Add a VPN connection.
- Now’s the time to enter the information provided by a VPN service or network administrator.
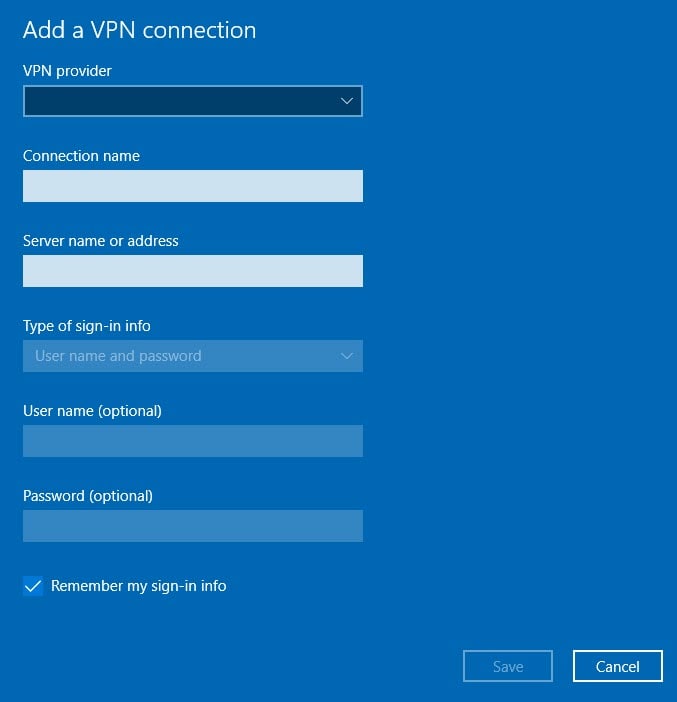
- Unless otherwise specified, under VPN provider, choose Windows (built-in).
- Connection name.
- Server name or address.
- Under the VPN type, you can choose a security protocol.We recommend L2TP/IPsec with certificate or L2TP/IPsec with pre-shared key.
- Choose the Type of sign-in info.
- Make sure the box in front of Remember my sign-in info is checked if you don’t want to re-enter sign-in details every time you connect.
- Click on Save.
- Optional. Click to flick the switch icon to ON position below Allow VPN over metered networks.This is crucial if you plan on using a VPN on a subscription plan with a monthly limit on the data download/upload.
- Optional. Flick the switch to ON position below Allow VPN while roaming if you plan to take your computer outside of the area covered by the Mobile or Internet Service Provider.
Use a dedicated application
This is a far easier option and one that becomes available with pretty much every serious VPN provider. We’ve already outlined the steps to download and install one in our guide on how to make a VPN always ON. Granted, we only covered ExpressVPN and NordVPN, but the steps should be similar no matter which provider you pick.
Adding VPNs on Windows 11
Most Windows users are already running Windows 11. If you are too, then it is optimum that you learn how to set up a VPN on it. While most of the things remain the same as they were with Windows 10, we do have a few changes on Windows 11.
Setup a VPN using Settings
The general method that we have already discussed during Windows 10 is to use the in-built settings. There are three parts to setting up a VPN, and we will briefly go through them all.
Part 1. Adding an Account
First, we have to create a VPN account.
- Go to the Start menu and click on Settings.
- Then click on Network & Internet and choose VPN.
- Now, click the Add VPN button.
- After that, specify the parameters as we did with Windows 10. (Since we have already done so, we won’t repeat them.)
Part 2. Add the VPN certificate
Now, let us add certificates:
- Launch the Run dialog box.
- Type “mmc” and hit Enter to open Microsoft Management Console.
- Then click on File and select Add/Remove Snap-in.
- On the left side, select Certificates and click on Add.
- Now, choose Computer Account in the new popup.
- Here, keep the same settings and click on Finish.
- Then unfold the Certificates on the left panel of the Console.
- After that, expand the Trusted Root Certification.
- Then finally, right-click on the folder and select All Tasks, and then Import.
Part 3. Change Network Properties
Finally, set your network properties.
- Go to the Network and Sharing Center.
- Click on Change Adapter settings.
- Now, right-click on the added VPN and click on Properties.
- Then go to the Networking tab and click on Internet Protocol Version 4,
- Finally, specify your DNS.